Tracking Trend
Contents
Overview
Trend analysis is one of the most useful tools for understanding the current state of things and their outlook.
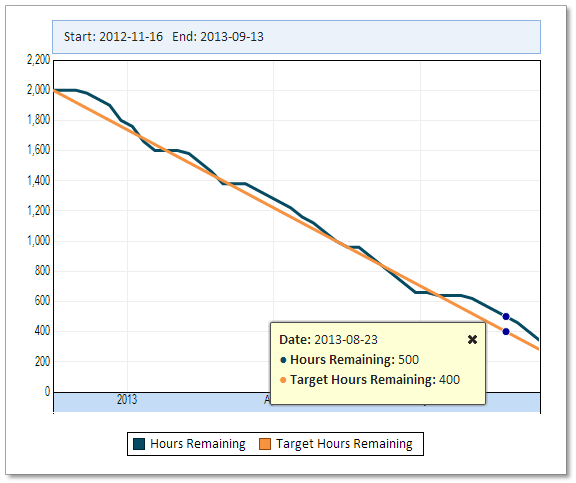
Tracking trend is useful for any calculated metric, such as inventory on hand, net worth, membership renewal rate, support backlog, top-10 list, and much more. Think for example how easy creating a burn-down chart becomes.
"Tracking Trend" is a name for a simple feature that makes it easy to trend data. It breaks the problem into three easy steps.
Step One
The first step is to create a view showing current information. For example, a pivot view could show the "% complete" by project, subproject and team as of the time of running the view. Selecting the project, subproject and team would allow you to create trend views at different levels, and you can implement drill-down in your trend view.
Note: beware of including ratios and average calculations in this view. Ratios and averages cannot simply be added together in a meaningful way. It is often a good idea to select the sum and the count of non-empty. Using these values you could later calculate ratios or averages at any level.
Step Two
The next step is to "Track Trend" on the view that was created in step One. "To Track Trend" means to create a job that runs the view on a specified schedule, for example daily, and capture the output into a table.
Step Three
The table created in step Two is perfect for creating trend views. The table has a date/time field indicating each time the view ran. A trend view can show trends at the project level and allow drill-down to the subproject and team level. Given the data, creating such a trend view is easy.
Track Trend
Tracking Trend requires the scheduler role (if you are a tenant_admin you already have this role).
Creating a Track Trend Job
To create a Track Trend job (step two above), we go to the view for which we want to track trend (the view discussed in step One above), we then select "Track Trend" from the "File" menu.
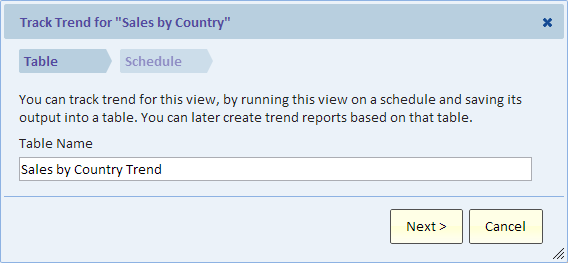
The following dialog shows up. It has two steps: Table and Schedule.
Table
In this step you name the table that will collect the trend data. The table is created on the Explore Analytics server and you can find it in the "Explore" data source. The table is created upon the first execution of the Track Trend job. Subsequent executions of the job insert additional data into this table.
To find this table after the first execution, list your track trend jobs and use the link on the table name.
Schedule
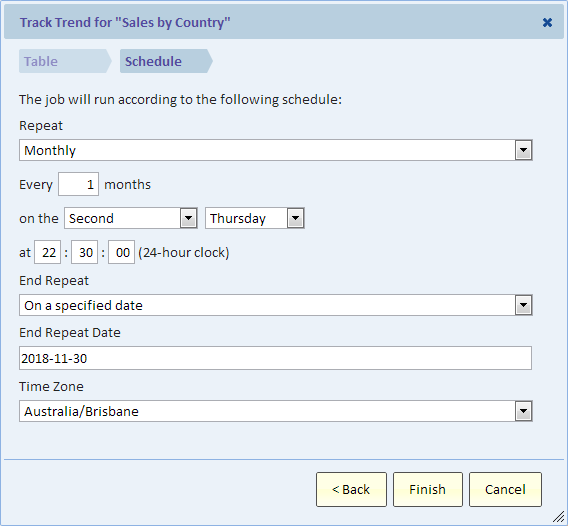
In this step you specify the schedule for the Track Trend job. The job will run on this schedule and collect data into the table that you specified in the previous step. The job does not publish the view. If you'd like to both publish and track trend, then you need to create two jobs. A "Schedule" (see Scheduling a View) and separately a Track Trend job as described here.
The fields of the Schedule step are identical to those of the Schedule step that are explained in detail in Scheduling a View.
Important Note
When creating the job, a copy of the view is made to prevent inadvertent modifications to the job. Since the job has its own copy of the view, you're free to make changes to the view that was used in step One.
Listing Track Trend Jobs
To view and modify your Track Trend jobs, select "Track trend jobs" from the "Admin" menu.
The list shows all your Track Trend jobs as well as shared jobs. You can see the last and next runs and whether there were any errors in the last run. If you click on a row in the list you can delete or edit the job, you can also share or un-share the job.
Editing a Track Trend Job
You can edit the job's schedule by selecting "Edit job" from the menu by clicking on a job as explained above. To edit the view itself, see the next section.
Editing the view
The Track Trend job has its own copy of the view from step One. You can find this view by listing your track trend jobs and using the link on the view name. Notice that the name is based on the name of the view from step One, but ends with "- trend input". If you modify this view, the changes will take effect on the next execution.
The Track Trend job can deal with new column labels that are discovered in subsequent runs. For example, if you have the product names in the columns and a new product was added, then the Track Trend job will add a corresponding field to your table.
See Limitations below.
Deleting a Track Trend Job
You can delete a job by selecting "Delete job" from the menu by clicking on a job. When you delete the job, the table that captures the trend data is not deleted. If you want to also delete the table, you'll need to locate the table in the Explore data source and delete it from there.
Errors in Track Trend Jobs
The list of track trend jobs shows an error message if the job failed with an error. If you can't make sense of the error message, then please contact Explore Analytics Support.
Creating a Trend View
Creating a trend view based on the table created by Track Trend is no different than creating views in general. When you create the view, select the table that you specified when you created the job. This table is in the "Explore" data source.
Limitations
In general, once you have created a Track Trend Job and it ran once and created the table, you should avoid making changes the view on which the job is defined. You may modify the filter, but you must not change the order of the fields or remove fields.
List View
After the Track Trend already ran and created its table, you can add a field to the view, but you must add it at the end.
Pivot View
When creating a trend view based on a pivot, there are some limitations. The main limitation is that you can only have one layer of headings in the pivot. You can have any number of "row labels" fields (down the side), but only one "column labels" field (across the top). If you have multiple value fields, then they must be shown across the top (the special "Values" field will show in "column labels") and you cannot have any additional "column labels" field.
To avoid these limits, simply put all the category fields in the row area. Later, when you create your trend view, it's not a problem to select these fields for the column area. Remember, at this stage we're just capturing and storing the data.
View Data Size Limit
There is a limit to the number of rows and columns that the view generates and inserts into the table. If that limit is exceeded, an error is generated and the job will not insert any rows in the table. The limit is similar to the limit on exporting view data.
Table Size Limit
The table is stored in the Explore data source. In other words, in Explore Analytics. The total size of all the tables that you keep in Explore Analytics is subject to the storage limit of your subscription. You can refer to the Storage Limit section of the Explore Analytics Terms and Conditions for information about that limit.
The next section explains how to control the data retention in the trend table. If, for example, you only need data going back 1 year, you can limit data retention to 1 year and not store unnecessary data.
Data Retention
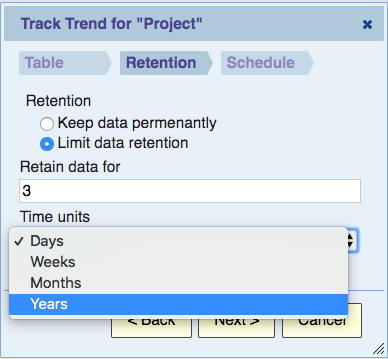
By default, data collected by a track trend job is kept for as long as that table is kept. However, you can limit data retention to a time period. For example, if you only intend to report on trend for the last 3 years, you could limit data retention to 3 years. Once you do that, any records that were inserted into the table more than 3 years ago will be automatically purged. The process of purging is ongoing, such that when data ages beyond the specified retention time, it will be automatically purged. The background task that performs this purge runs once a day.
To set a limit, choose "Limit Data Retention", and then specify the number of days, weeks, months, or years.


