Slicer
Contents
Introduction
A slicer is user-interface control used for selecting a value that is then passed as a parameter to a view. A slicer is part of a dashboard.
For a slicer to control a view, the view must have a parameter that matches the slicer's parameter name.
Note: The functionality described on this page is only available with an Enterprise Plus subscription.
There are different kinds of slicers:
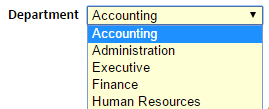
- A select slicer displays a selection of values. Those values are obtained from the data source, for example by selecting all the unique department names from the department table. In fact a slicer has an input view that selects values for it. By editing this input view you have full control over exactly what values will be displayed in the slicer.
- A choice slicer displays a selection of choices based on a choices that are defined for a field of type choice.
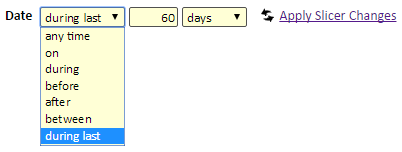
- A custom date slicer allows the user to select a range of dates for the report. For example, selecting "during" "this month" or "between" two dates that the user selects. This allows the user to select custom subsets of the data in the report.
Slicers and View Parameters
A Slicer value is passed to any view on the dashboard that has a corresponding parameter. For example, a Slicer can allow the user to select a department and a view on the same dashboard could have a department parameter. This pairing means that when the user selects a department, the view will be updated to show data for that department.
A slicer can affect multiple views on the dashboard if those views all have a matching parameter name. If the dashboard has tabs, the slicer can only affect views on the same tab as the slicer.
Global Slicer
A global slicer in a multi-tab dashboard is a slicer that is displayed on all the tabs. The slicer is positioned in one of the "global" locations (above "top"). It is displayed above the tabs. It's parameter applies to all the tabs. A global slicer remains on the dashboard when the user clicks between tabs.
To create a global slicer, follow the same steps for creating a slicer (see the next section) and positioning the slicer in a "global" location. You can also move a slicer between a "global" location and another location (e.g. "top 1") by editing the slicer using the gear icon that's displayed next to the slicer. When moving a slicer to a non-global location, it will subsequently apply to the tab that is selected at the time it is updated (only to that tab).
Creating a Slicer
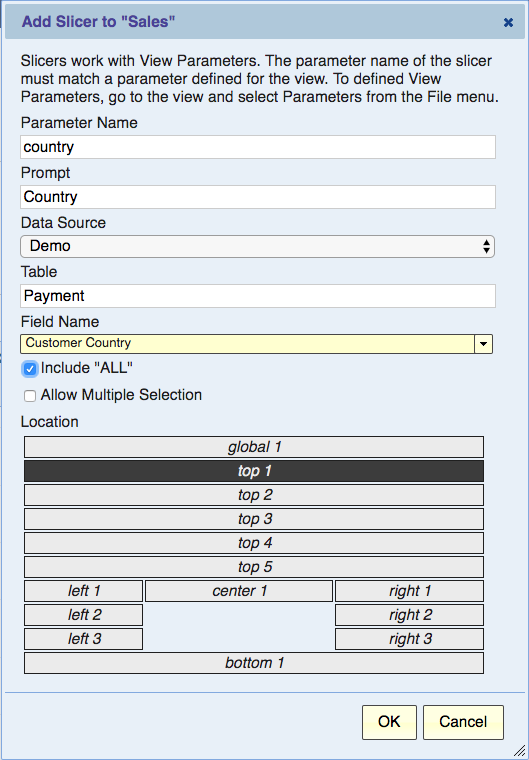
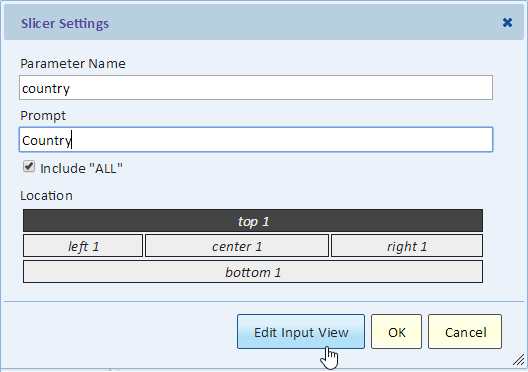
A slicer is created by adding a slicer to a dashboard. The slicer then becomes part of the dashboard. To create a slicer, use the “Add Slicer” button on a dashboard. The following dialog is displayed.
Parameter Name
The name of the parameter is they key that ties it to the View Parameter. The slicer will affect any view on the dashboard that has a matching parameter name.
Prompt
This is the label that will be displayed next to the selection. For example, “Department”
Data Source
The selections are retrieved from the data source. For example, in the Add Slicer dialog, we retrieve the selections from the Payment table of the Demo data source.
Table
Specify the name of the table that will provide the selections. Use the autocomplete to choose the table.
Field Name
Specify the name of the table field that will provide the selections. The Slicer will select unique values for this field. For example, selecting the Customer Country field will populate the Slicer with all the distinct countries for customers in the Payment table.
If you select a choice field, you'll see an option to create a Choice slicer. A Choice slicer will display the all the choices that are defined as part of the definition of the choice field. Alternatively, a regular slicer (a "select" slicer) will show choices that are actually in use, and may also show the empty value as part of the selection.
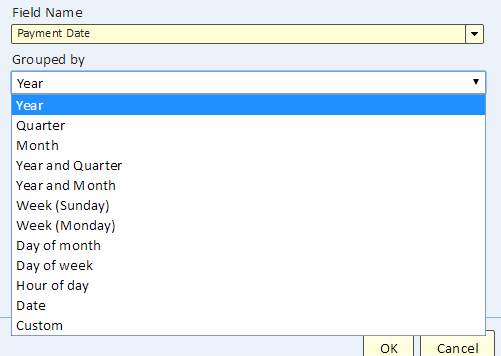
If you select a date/time field, you'll be prompted to also select a date grouping. See Date/Time Slicer below.
Include "ALL"
If you check this box, an "--ALL--" option will be provided as the default selection in the Slicer. Selecting this value means that the parameter will be not applied and will not restrict data in the corresponding views.
If you select this checkbox, you'll see another option: "Limit "ALL" to available selections."
This property is relevant if your slicer's input view is filtered.
If "Limit "ALL" to available selections" is checked, when the user sets the slicer to "--ALL--", the parameter on the slicer input view will still be respected and select all the possible selections but nothing more. For example, if the slicer input view limits the slicer to four selections, then in this case "--ALL--" would mean all four selections. If this option is not checked, then "--ALL--" means that the slicer will have no effect and will not restrict data selection in any way.
For a custom date/time field, this option is not shown. The custom date/time slicer will have a "any time" choice that's equivalent to "-- ALL --"
Allow Multiple Selection
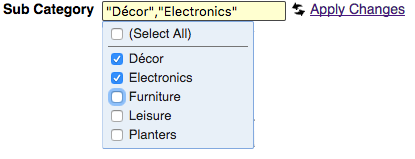
This option is available for any field type except a Date/Time field. The corresponding parameter (in any view controlled by this slicer) must be set to to Allow Multiple Selection. When the Slicer allows multiple selection, the user will see a picker that allows making a selection and then the user can click "Apply Changes" to apply the selection. The reason that the selection is not applied until "Apply Changes" is clicked allows the user to make multiple selections before running the view.
Date/Time Slicer
When you pick a date/time field for your slicer, you must select grouping:
- Year - select the year, e.g., "2016". The choices are the years for which this field has data.
- Quarter - select the quarter - Q1 through Q4. The choices here are fixed to the 4 choices (using a choice slicer).
- Month - select the month - Jan through Dec. 12 fixed choices using a choice slicer.
- Year and Quarter - select a particular quarter, e.g., "Q4-2016". The choices are based on the field's data.
- Year and Month - select a particular month, e.g., "Dec-2016". The choices are based on the field's data.
- Week (Sunday) - select a particular week, e.g., "2016-09-18". The choices are based on the field's data.
- Week (Monday) - select a particular week, e.g., "2016-09-19". The week starts on a Monday. The choices are based on the field's data.
- Day of month - select from 1 to 31. Data will show for dates with that day of the month.
- Day of week - select from Sunday to Saturday. Data will show for dates with that day of the week.
- Hour of day - select from 00 to 23 (24 hour clock).
- Date - select the date, e.g., "2016-09-30". The choices are based on the field's data.
- Custom - select a custom date range. See the next section.
As notes, some of these options provide choices based on the data for the field. For example, if the data includes dates in 2014 and 2015, then the choices for year will be those 2 years. These choices are obtained using an input view which you can edit.
On the other hand, some grouping have a fixed set of choices. For example "Day of week" will always have the 7 days of the week to choose from regardless of the data. For those options, a choice slicer is used and there's no input view to edit. If you want to change the grouping you can delete the slicer and create a new one.
Custom Date/Time Slicer
A Custom Date/Time slicer works in conjunction with a view parameter for a date/time field with "custom" grouping.
This type of slicer allows the user to select date and times. It starts off showing all the dates in the report. The user can select various options to restrict the date and time shown in the report.
- any time - does not limit the data in the report
- on - limit the report to data for a particular date
- during - limit the report to the selected period such as "today" or "last month"
- before - limit the report to dates before the selected period
- after - limit the report to dates after the selected period
- between - limit the report to dates between the two user-specified dates (user can also type in the time, for example 2016-02-12 12:00:00)
- during last - limit the report to the last "n" selected periods, for example the last 60 days. Periods include hours, days, weeks, months, and years
After making the selection, the user must click "Apply slicer changes" to apply the slicer to the views with the corresponding parameter
Editing the Slicer’s Input View
A select slicer will have an input view for getting the slicer selections from the data. A choice or custom date/time slicer does not have an input view.
The “Add Slicer” dialog creates a Slicer with an input view. The input view is a Pivot view with a single field. This input view selects the different values for the field and sorts them.
You can do a lot more with Slicers by editing their input view. For example, you could exclude some values, restrict values to recent data and for example only show countries with payments in the current year. To edit the Slicer’s input view, use the gear icon to bring the Slicer Settings Dialog.
Using the Edit Input View you can go to the input view and then edit it like you would edit any other view.
A Slicer May Itself be Parameterized
In certain cases, you may need to have a slicer that displays choices based on the selection of a previous slicer. For example, a sub-category slicer may show sub-categories based on the selection of the category slicer.
A Dashboard allows a slicer to be based on another slicer in this manner, as long as the slicers are ordered such that the slicer that depends on another slicer will be display after (below or to the right of) the other slicer.
To make a slicer parameterized, edit its input view (as described in the previous section) and then add a parameter to the input view.
Slicer Values vs Slicer Labels
Typically, what's showing in the slicer choices are the actual values. If your data field has a display value that's different from the actual value (this is typical with ServiceNow), then the display value is shown in the choices while the actual value is passed as the parameter value.
When you edit a slicer, you can turn it into a two-column view. In that case, the slicer will use the first column for the labels and the second column for the actual values. For example, suppose your parameter is country code (e.g. "US"), but you want the choices to be the country name (e.g. "United States"), then you can put the country name in the first column and the country code in the second column. The user will choose the country by name, but the parameter will pass the country code to the view. Be sure to only do this when there's a one-to-one relationship between the labels and the values. In our example it's okay because the country names uniquely corresponds to the country code.
Slicer Default Value
When you create a new slicer, it doesn't have a default value and the first selection is shown. Once you make a selection using the slicer, that selection is saved and serves as the default from that point going forward.
Default Value in Published Dashboards
To set the default slicer value for a published dashboard, simply select the value in the slicer before you publish. When you publish, a copy of the dashboard is created including the slicer and its default value. Once published, the published dashboard and slicers are "read-only" and therefore changes to slicer selection are not saved.
