Data Sources and Tables
Contents
Overview
Data for analysis is organized in tables grouped under data sources. See Preparing to Explore for more information about configuring data sources and uploading data.
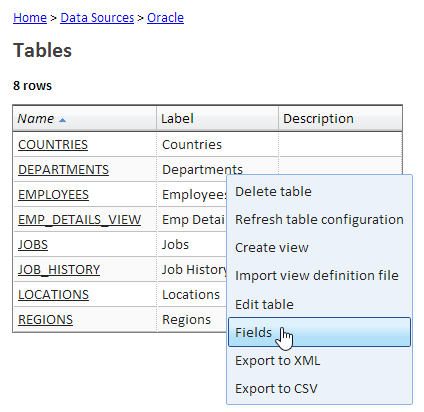
The menu option "Data" -> "Browse data sources and tables" displays a list of your data sources. Click on a data source name to get a list of tables for that data source. From there you can click on a table name to see a list of views for that table and to create a new view. You can also use the context menu to access many table options such as displaying its fields.
Editing a Table
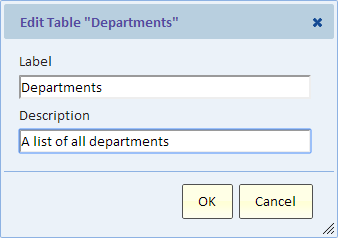
You can edit the label and description for a table. This will help your users decide when to use the table. To edit a table, using the list of table shown above click (or touch) the row for the table to bring up the context menu and select "Edit table".
Deleting a Table
If the table belongs to an external data source, then deleting the table will only remove it from Explore Analytics and will not affect the table itself on the remote data source. On the other hand, if the table is stored in Explore Analytics, for example if you uploaded a file, then deleting the table will also delete all the data from Explore Analytics.
If you delete a table, all views that are defined on this table will also be permanently deleted. Also, if there are other tables with reference fields that point to this table, then deleting this table may break views created on those other tables and you probably should not delete this table.
If you decide to delete this table, use the "Delete table" option of the context menu shown in the picture in the previous section.
Changing a Table Label
Changing the label simple changes the display name of the table anywhere tables are listed in Explore Analytics. You can change the name to make it more descriptive to make it easier for users to select the table. It's also an opportunity to localize the table label to your language.
Refresh Table Configuration
If new fields were added to the table after the data source in Explore Analytics was created, you can refresh the table configuration to add the new fields in Explore Analytics.
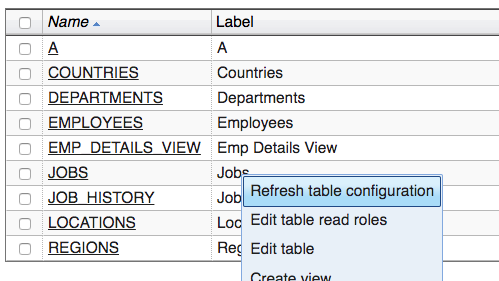
To refresh the table, use the context menu (right click or touch) for the table in the list of tables for the data source and select "Refresh table configuration"
Listing Table Fields
Select "Fields" from the context menu shown in the overview above. It shows a list of all the fields of the table. You can edit table fields as explained in the next section by clicking on a field and selecting "Edit this field" from the context menu.
Editing fields requires the "tenant_admin" role. If you don't have this role, you will not see the editing options. In that case, you'll need someone with the tenant admin role to make the change for you or grant you the "tenant_admin" role.
Editing Table Fields
The following attributes of a field are automatically set, however depending on your role and permission, you may be able to edit them. When editing fields, you are editing the field definition for all users who may access this table. Therefore, the changes you make will affect all these users and any view that is based on this table.
- Name - the name of the field in the database. When you upload a CSV File, this is the field name from the file. The name cannot be edited
- Label - the display name of this field. This is the name shown when selecting fields and it is the title shown for fields in views. You can edit the label to shorten it or to make it more descriptive. You can also use the label to translate the name to your language.
- Type - the type of this field: datetime, decimal, integer, text, duration, choice, or reference. When you change the type, you are not changing the data, but only the way that Explore Analytics interprets the data in this field. Your choice of types will be restricted. For example, you may interpret a number as text, but not as a date.
- Target Table - if the type is reference, it means that this field hold values that can be used to uniquely identify records in another table. The Target Table is the name of the other table.
- Target Field - if the type is reference, it means that this field hold values that can be used to uniquely identify records in another table. This field can be matched against the "Target Field" of the other table. The "Target Field" is often referred to as the primary key of the other table.
- Use As Label - at most one field of this table can be designated to be used for display when another table has a reference field that points to this table. To understand this, imaging an "employee" table with a "department" field. The "department" field hold the department ID and is a reference to the "ID" field in the "department" table. Now, if the "department" table designate the "name" field as "Use As Label", then instead of displaying the department ID when the user selects the "department" field, we could display the department name. Currently, you cannot change the assignment of "Use As Label". It's used automatically with certain data sources.
- Hierarchy - if this field is part of a drill-down hierarchy, then the name of the hierarchy is shown here. See Drill Down for more information about defining drill-down hierarchies.
- Drill Down - if this field is part of a drill-down hierarchy, then the it shows the name of the field that's next (down) in the hierarchy.
- Drill Up - if this field is part of a drill-down hierarchy, then the it shows the name of the previous field (up) in the hierarchy.
Reference Fields
Reference Fields are automatically defined when you add a data source that is a database such as Oracle or MySQL and the database has these references already defined (they are called Referential Integrity Constraints). In that case, Explore Analytics will automatically defined fields that have a (single field) referential constraint as reference field.
A reference field has values that uniquely identify rows in another table by matching a field in that table. These are called the Target Table and Target Field respectively. You can manually define reference field.
Manually Defining a Reference Field
Note: Editing fields requires the "tenant_admin" role. If you don't have this role, you will not see the editing options. In that case, you'll need someone with the tenant admin role to make the change for you or grant you the "tenant_admin" role.
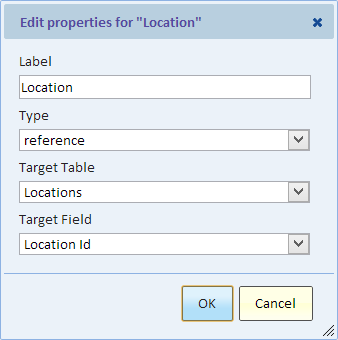
Let's do this by example. The location field is a reference to the "Locations" table and will match the "Location Id" field in that table:
Both tables must be in the same data source.
To bring up the following dialog, click on the the location field (in the field list) select "Edit this field" from the context menu.
- Label - This is the display name of the current field. No need to change that.
- Type - Set this to "reference". The next two fields will be revealed.
- Target Table - the name of the table that this field point to.
- Target Field - the name of the field in the target table that this field will match.
It it crucial that the target field uniquely identifies records in the target table. If that assumption does not hold, bad things happen (for example, double-counting data). If the target table is in the Explore data source, in other words, if it's a table that is stored in Explore Analytics, a unique index will be created and an error will be reported if the target field has any duplicate values.
The next time you select fields from this table you'll be able to also select fields from the Locations table by expanding the list under the location field.
Restricting Access
By default, users who have the "explorer" role (regular users) can list all the data sources and tables. You can however restrict access to listing data sources and tables by assigning one or more roles to the table or data source. If you do that, then only users who have at least one of the specified roles would be allowed to list the table or data source and to create a new view for such table.
Access via Existing Views
Restricting access to data sources and tables prevents the user from listing those tables and creating new views. However, existing views to which the user may have access would continue to provide the user with access to these tables. Care should be taken when sharing views because through a shared view, a user who may otherwise have no access to a table can not only see the view, but also modify the view to display additional data. You can control access to shared views using role.
Editing Roles for a Table or Data Source
To assign roles to a table or data source, follow these steps:
- Using the "Browse data sources and tables" option on the "Data" menu, bring up the list
- Navigate to the data source or table and click on that line to display the context menu
- From the context menu, select "Edit data source roles" or "Edit table roles"
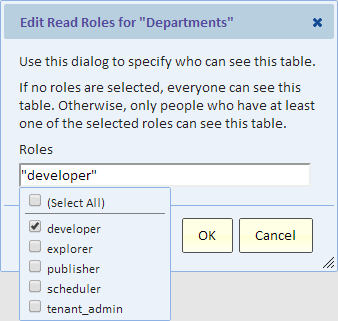
- The Edit Read Roles dialog is displayed
Select roles from the drop down list. Remember that users will need just one of these roles, so selecting more roles can potentially increase the number of users who can see the data source or table.
To remove roles from the list simply uncheck them. If you clear out Roles completely, then anyone with the "explorer" role can see the table or data source.
To create a new role, simply type its name in Roles. Type a comma followed by the name of the new role. The double quotes around the name are optional. If you specify a new role, then no user currently has that role and therefore no user (including yourself) will be allowed to see this table or data source, so remember to grant this new role to yourself and other users who should have this new role.
Editing Roles for Multiple Tables
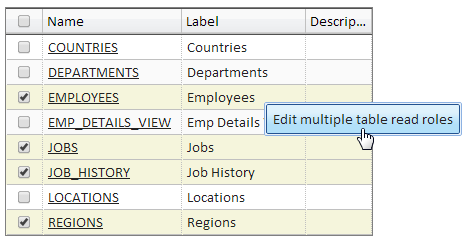
You can edit roles for multiple tables in one action. To do that, select multiple tables using the check boxes on the left.
You can select/deselect all using the checkbox at the top (in the heading).
Once you made your selection, click on one of the selected rows and select "Edit multiple table read roles" from the context menu.
The roles dialog allows you to specify roles (or not roles) and then click OK. The existing settings is not shown because it may be different between different tables in your selection.
