Slicer
Contents
Introduction
A slicer is user-interface control used for selecting a value that is then passed as a parameter to a view. A slicer is part of a dashboard.
For a slicer to control a view, the view must have a parameter that matches the slicer's parameter name.
Note: The functionality described on this page is only available with an Enterprise Plus subscription.
There are different kinds of slicers:
- A select slicer displays a selection of values. Those values are obtained from the data source, for example by selecting all the unique department names from the department table. In fact a slicer has an input view that selects values for it. By editing this input view you have full control over exactly what values will be displayed in the slicer.
- A choice slicer displays a selection of choices. For example, selecting a category based on a choice field or selecting a date grouping such as "year", or "year and quarter".
- A custom date slicer allows the user to select a range of dates for the report. For example, selecting "during" "this month" or "between" two dates that the user selects. This allows the user to select custom subsets of the data in the report.
Slicers and View Parameters
A Slicer value is passed to any view on the dashboard that has a corresponding parameter. For example, a Slicer can allow the user to select a department and a view on the same dashboard could have a department parameter. This pairing means that when the user selects a department, the view will be updated to show data for that department.
A slicer can affect multiple views on the dashboard if those views all have a matching parameter name. If the dashboard has tabs, the slicer can only affect views on the same tab as the slicer.
Creating a Slicer
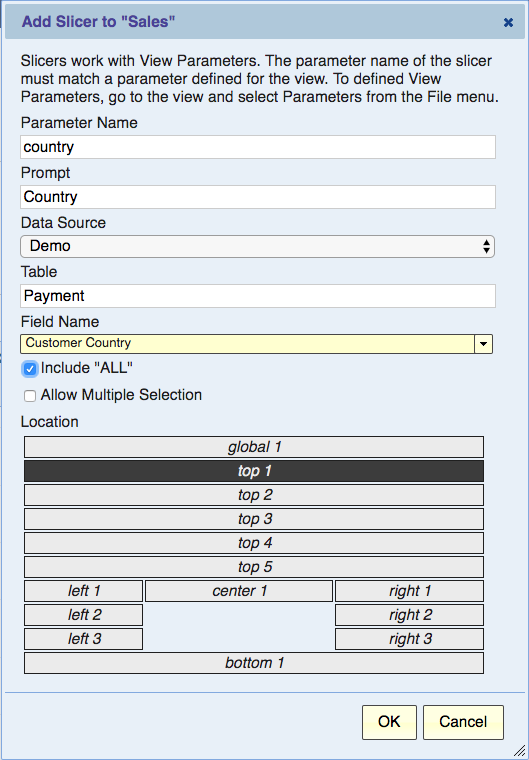
A slicer is created by adding a slicer to a dashboard. The slicer then becomes part of the dashboard. To create a slicer, use the “Add Slicer” button on a dashboard. The following dialog is displayed.
Parameter Name
The name of the parameter is they key that ties it to the View Parameter. The slicer will affect any view on the dashboard that has a matching parameter name.
Prompt
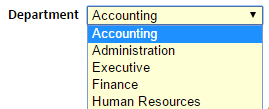
This is the label that will be displayed next to the selection. For example, “Department”
Data Source
The selections are retrieved from the data source. For example, in the Add Slicer dialog, we retrieve the selections from the Payment table of the Demo data source.
Table
Specify the name of the table that will provide the selections. Use the autocomplete to choose the table.
Field Name
Specify the name of the table field that will provide the selections. The Slicer will select unique values for this field. For example, selecting the Customer Country field will populate the Slicer with all the distinct countries for customers in the Payment table.
If you select a choice field, a choice slicer will be created. A choice slicer will simply display the all the choices of the choice field.
If you select a date/time field, you'll be prompted to also select a date grouping. See Date/Time Slicer below.
Include "ALL"
If you check this box, an "--ALL--" option will be provided as the default selection in the Slicer. Selecting this value means that the parameter will be not applied and will not restrict data in the corresponding views.
For a custom date/time field, this option is not shown. The custom date/time slicer will have a "any time" choice that's equivalent to "-- ALL --"
Editing the Slicer’s Input View
A select slicer will have an input view for getting the slicer selections from the data. A choice or custom date/time slicer does not have an input view.
The “Add Slicer” dialog creates a Slicer with an input view. The input view is a Pivot view with a single field. This input view selects the different values for the field and sorts them.
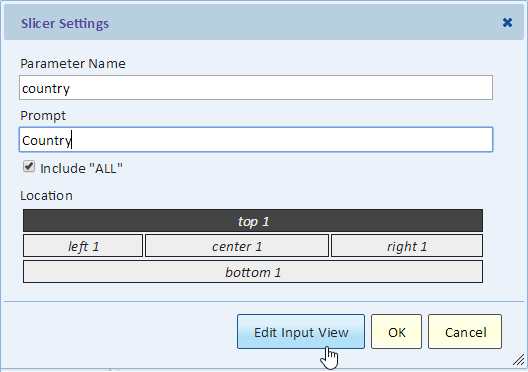
You can do a lot more with Slicers by editing their input view. For example, you could exclude some values, restrict values to recent data and for example only show countries with payments in the current year. To edit the Slicer’s input view, use the gear icon to bring the Slicer Settings Dialog.
Using the Edit Input View you can go to the input view and then edit it like you would edit any other view.
A Slicer May Itself be Parameterized
In certain cases, you may need to have a slicer that displays choices based on the selection of a previous slicer. For example, a sub-category slicer may show sub-categories based on the selection of the category slicer.
A Dashboard allows a slicer to be based on another slicer in this manner, as long as the slicers are ordered such that the slicer that depends on another slicer will be display after (below or to the right of) the other slicer.
To make a slicer parameterized, edit its input view (as described in the previous section) and then add a parameter to the input view.


